An alternative to scanning samples
Posted: 15 Feb 2009, 18:38
My dendrochronological research is focused on musical instruments, mainly from the violin family. Therefore using a scanner is not an option, as violin tops are always arched. Accordingly I have always been working with a photo camera.
I use a reflex camera, Nikon D80, together with a 150mm macro lens. But any lens with a focal length of 100mm or higher will be suitable for dendrochronological analysis. It should, however, be a macro lens. True macro lenses are fix-focal lenses, which means that their optical design is optimized without compromises for one focal length, resulting in sharp and virtually distortion-free images.
Most of the ordinary lenses, on the contrary, are zoom lenses which usually suffer from barrel distorsion at one end of the zoom range and from pincushion distortion at the other end. Only a small part of the range is free from distortion. Additionally, the minimum focusing distance of these lenses is significantly higher than that of macro lenses. This means that you will not be able to get close enough to the sample, resulting in photos with a too low resolution.
However, also macro lenses would produce low resolution photos if I would insist on taking the picture with a single shot. When photographing half a violin top plate (ca. 10cm) with a 10MP camera the resulting resolution would be about 980dpi, which is much too low for serious measurements.
My minimum requirement for violins is 2500dpi (ca. 0,01mm/dot); I am a little bit less demanding as far as cellos or double basses are concerned (2000-2200dpi), as they generally have a higher average ring width.
The trick to nevertheless achieve the required resolution is to take partial photos which can be put together with a stitching software.
"Photo stitching is the process of combining multiple photographic images with overlapping fields of view to produce a segmented panorama or high-resolution image" (from Wikipedia)(1).
I will describe my method using the example of half a violin top plate.
First I put a ruler made from paper across the violin. The ruler has markers (black rectangles) at 25mm intervals to aid with framing. As I already mentioned, dedicated macro lenses have no zoom mechanism, therefore I adjust the distance of the camera in order to see a 35mm portion of the ruler centered around two markers when looking through the viewfinder. Making the pictures wider than the distance between the markers ensures that there will be enough overlap between the photos, which is required by the stitching software to work properly.
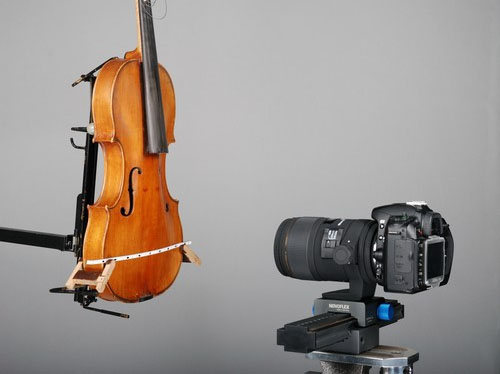
To make sure that all photos have (almost) the same resolution, an exact lateral movement of the camera is required. I achieve this by using a sliding micropositioning plate, which is a device that enables an exact linear movement of the camera (2). Here is a photo of a typical set up:

To cover half a violin top plate I need four photos:

The black rectangles serve also as references for the stitching software, to help finding corresponding areas between the photos. Year rings alone often do not have enough details for the pattern matching algorithms.
The stitching process is automatic. However, manual corrections are regularly required. The millimeter division of the ruler helps with checking whether the photos have been put together correctly.

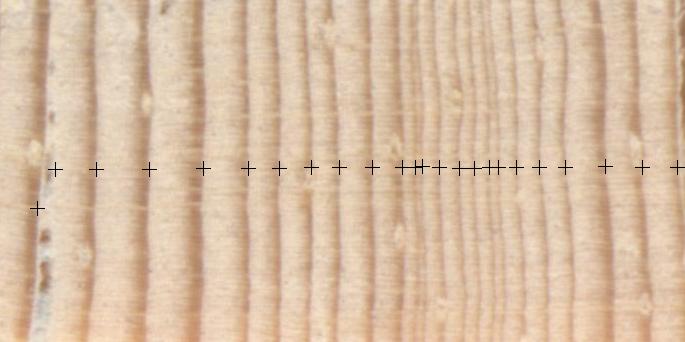
This is a 100% crop of the photo above, viewed in CooRecorder. The resolution is 2625dpi:

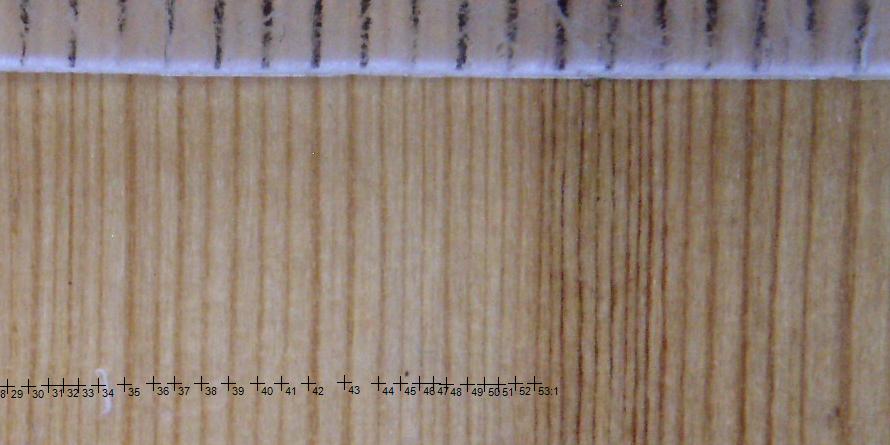
To check the linearity of the stitched photo I performed a "rulertest".
(See also: http://www.cybis.se/forfun/dendro/helpc ... ?calibrate) (Link edited 2016-04-20/LÅL)
This is the result:

The "ring width curve" made from the millimeter marks drops slightly towards the right because the positioning plate is not running exactly parallel to the violin, which actually is impossible to achieve as violin tops are always arched.
I have divided the 101 points of the measurement series into four segments and calculated the mean value of each segment to quantify the non-linearity.
From the left to the right:
1st segment (100-75) mean value=1,011mm
2nd segment (74-50) mean value=1,004mm
3rd segment (49-25) mean value=0,996mm
4th segment (24-0) mean value=0,986mm
Altogether this is a perfectly acceptable result. It will probably be even better when working with flat samples.
I agree that to take accurate photos of samples for dendrochronological analysis the first choice should always be a scanner. But if a scanner is not an option because the sample is not flat, as in my case, or because the sample is too big or too heavy (e.g. a piece of furniture) or for some other reason, the method I described is a practical alternative.
---------------------------------------
Notes:
(1) I use alternately two stitching tools: PanoramaMaker which I found on the CD-ROM that was shipped with a Panasonic camera I purchased a few years ago, and PhotoStitch which is shipped with Canon cameras. Occasionally one software struggles more than the other to put the single pictures together correctly, therefore I sometimes switch between the two. Apparently they work with different algorithms.
Here you will find a list of stitching tools. However, excluding PanoramaMaker, I am not familiar with any of them.
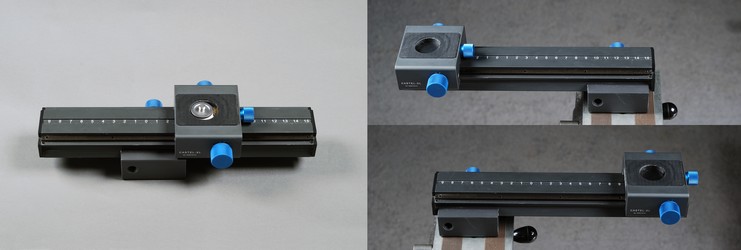
(2) I have purchased mine (Novoflex CASTEL-XL) at Brenner,
a German mail-order business for photographic equipment. (Unfortunately the site is only in German).

The upper block, which carries the camera, can be accurately positioned with the knob at the front. The beam that on its part carries the upper block can be pushed back and forth to increase the effective length of the adjustment track to 380mm, despite the length of the beam being only 256mm.
I have chosen for this large range in order to be able to measure double basses in one operation. More common lengths of the adjustment track vary between 100mm and 150mm.
This is an English site advertising the Manfrotto454:
http://www.bristolcameras.co.uk/p-manfr ... -plate.htm
I use a reflex camera, Nikon D80, together with a 150mm macro lens. But any lens with a focal length of 100mm or higher will be suitable for dendrochronological analysis. It should, however, be a macro lens. True macro lenses are fix-focal lenses, which means that their optical design is optimized without compromises for one focal length, resulting in sharp and virtually distortion-free images.
Most of the ordinary lenses, on the contrary, are zoom lenses which usually suffer from barrel distorsion at one end of the zoom range and from pincushion distortion at the other end. Only a small part of the range is free from distortion. Additionally, the minimum focusing distance of these lenses is significantly higher than that of macro lenses. This means that you will not be able to get close enough to the sample, resulting in photos with a too low resolution.
However, also macro lenses would produce low resolution photos if I would insist on taking the picture with a single shot. When photographing half a violin top plate (ca. 10cm) with a 10MP camera the resulting resolution would be about 980dpi, which is much too low for serious measurements.
My minimum requirement for violins is 2500dpi (ca. 0,01mm/dot); I am a little bit less demanding as far as cellos or double basses are concerned (2000-2200dpi), as they generally have a higher average ring width.
The trick to nevertheless achieve the required resolution is to take partial photos which can be put together with a stitching software.
"Photo stitching is the process of combining multiple photographic images with overlapping fields of view to produce a segmented panorama or high-resolution image" (from Wikipedia)(1).
I will describe my method using the example of half a violin top plate.
First I put a ruler made from paper across the violin. The ruler has markers (black rectangles) at 25mm intervals to aid with framing. As I already mentioned, dedicated macro lenses have no zoom mechanism, therefore I adjust the distance of the camera in order to see a 35mm portion of the ruler centered around two markers when looking through the viewfinder. Making the pictures wider than the distance between the markers ensures that there will be enough overlap between the photos, which is required by the stitching software to work properly.
To make sure that all photos have (almost) the same resolution, an exact lateral movement of the camera is required. I achieve this by using a sliding micropositioning plate, which is a device that enables an exact linear movement of the camera (2). Here is a photo of a typical set up:

To cover half a violin top plate I need four photos:

The black rectangles serve also as references for the stitching software, to help finding corresponding areas between the photos. Year rings alone often do not have enough details for the pattern matching algorithms.
The stitching process is automatic. However, manual corrections are regularly required. The millimeter division of the ruler helps with checking whether the photos have been put together correctly.

This is a 100% crop of the photo above, viewed in CooRecorder. The resolution is 2625dpi:

To check the linearity of the stitched photo I performed a "rulertest".
(See also: http://www.cybis.se/forfun/dendro/helpc ... ?calibrate) (Link edited 2016-04-20/LÅL)
This is the result:

The "ring width curve" made from the millimeter marks drops slightly towards the right because the positioning plate is not running exactly parallel to the violin, which actually is impossible to achieve as violin tops are always arched.
I have divided the 101 points of the measurement series into four segments and calculated the mean value of each segment to quantify the non-linearity.
From the left to the right:
1st segment (100-75) mean value=1,011mm
2nd segment (74-50) mean value=1,004mm
3rd segment (49-25) mean value=0,996mm
4th segment (24-0) mean value=0,986mm
Altogether this is a perfectly acceptable result. It will probably be even better when working with flat samples.
I agree that to take accurate photos of samples for dendrochronological analysis the first choice should always be a scanner. But if a scanner is not an option because the sample is not flat, as in my case, or because the sample is too big or too heavy (e.g. a piece of furniture) or for some other reason, the method I described is a practical alternative.
---------------------------------------
Notes:
(1) I use alternately two stitching tools: PanoramaMaker which I found on the CD-ROM that was shipped with a Panasonic camera I purchased a few years ago, and PhotoStitch which is shipped with Canon cameras. Occasionally one software struggles more than the other to put the single pictures together correctly, therefore I sometimes switch between the two. Apparently they work with different algorithms.
Here you will find a list of stitching tools. However, excluding PanoramaMaker, I am not familiar with any of them.
(2) I have purchased mine (Novoflex CASTEL-XL) at Brenner,
a German mail-order business for photographic equipment. (Unfortunately the site is only in German).

The upper block, which carries the camera, can be accurately positioned with the knob at the front. The beam that on its part carries the upper block can be pushed back and forth to increase the effective length of the adjustment track to 380mm, despite the length of the beam being only 256mm.
I have chosen for this large range in order to be able to measure double basses in one operation. More common lengths of the adjustment track vary between 100mm and 150mm.
This is an English site advertising the Manfrotto454:
http://www.bristolcameras.co.uk/p-manfr ... -plate.htm

