Last update: 27 January 2016
|
This describes blue channel calibration mechanisms as done with CooRecorder version 8.1
|
|
How to detect uncalibrated scanning?
Using a blue color patch with a known blue CI value.
Important!
If you include a blue color patch with all your sample scans then that patch can reveal an uncalibrated scan if the correct blue CI value of the patch is known.
Possibly it would be best to include two patches of slightly different blue color and also print the correct blue CI-values on them.
Before the person doing the blue CI measurements starts to measure blue CI data, he/she should first check the blue values of
the patches and compare these values to the numbers printed on them. This measurement can easily be done with the CooRecorder densitometer.
If the values differ too much, the scanned image is not suitable for registration of absolute (correctly calibrated) blue CI values.
Note: It is essential that such color patches are kept clean (avoid putting your finger prints on them) and that they are not exposed to sun light.
|
|
How to make your own calibrated blue color patches
|
|
 |
Steps to make your own calibrated blue color patches:
- Put your IT8/7.2 calibration target card on your scanner together with two blue papers which you want to use for color patches.
See that there is no pattern on the paper surface that might produce different blue values depending on the scanning direction accross the paper.
- Make the scanner calibrated if this has not already been done.
- Check that the histogram window is reset so that no colors will be "cropt away".
- Scan the card image together with some area of the blue papers as shown above. See that "Filter" is set to none. Use e.g. 400 dpi and scan the image to a .tif file
|
|
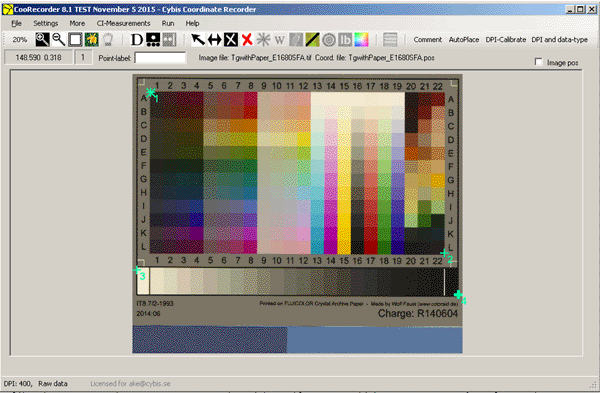 |
- Open your image in CooRecorder
- Set type of data to "Raw data, normal is 1 point per group"
- Set the four diagonal points as shown above
- Save as a .pos file
|
|
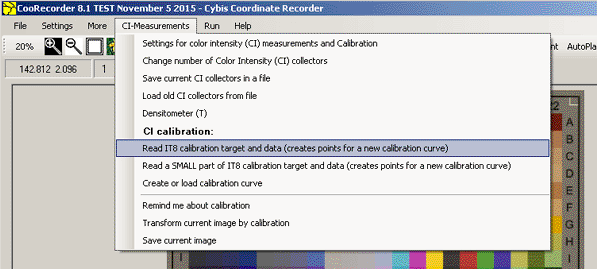 |
- Click the menu command "CI-Measurements" and select "Read IT8 calibration target and data (creates points for a new calibration curve)"
- When requested, look up the IT8 calibration card DATA file (in this case a file named "R140604.txt" delivered with the card shown above)
- CooRecorder will now deposit a temporary copy of that data file in that same directory of the data file. The file will here be named "R140604_WithRGBFromD50.tmp". That
file contains not only the data from the original data file but also RGB-values which you can later look up for checking.
|
|
 |
- CooRecorder will then present you with a diagram showing where data will be measured from the calibration card. If this looks OK, continue and save the
resulting "calibration points file".
|
|
 |
- In the "CI calibration curve" window that then opens, click "Calibration POINTS" and open the points file you just saved.
- Adjust the polynomial order to make the best fit between the calibration curve and the points on the diagram.
- Click "Calibration CURVES" and save the calibration curve with a suitable name. It might be a good idea to have all curve file names start with the text "CURVE_"
- Select "Calibration ON" in the lower right corner of the windows.
- Click OK to close the window.
|
|
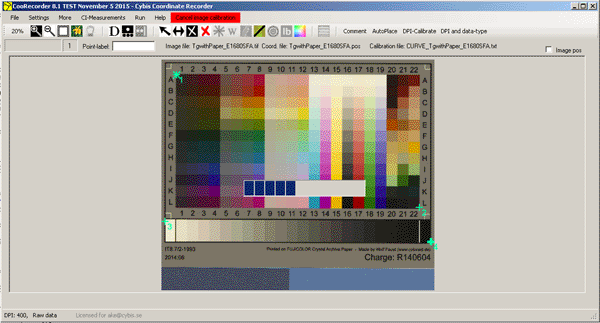 |
- We will now transform this image according to the current calibration curve. For this, use the command "CI-Measurements/Transform current image by calibration"!
- When asked, save the image but retain the string "_NEW" within the new image file name. This will make CooRecorder know that this file has already been
transformed according to a calibration curve. If you later try to have a calibration curve applied to this image, then CooRecorder will warn you about that.
- CooRecorder will then reload your previous untransformed image file. Close it!
|
|
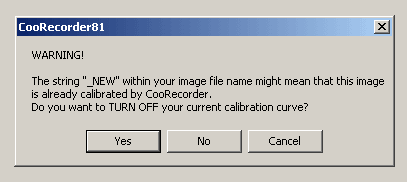 |
- Now, open the transformed "_NEW" file you saved above and also turn off calibration as the file has already been calibrated.
If you have left the proposed "_NEW" string within the filename, CooRecorder will ask you if calibration should be turned off: Select Yes
|
|
 |
- Now use the CooRecorder densitometer to measure some blue spots on the calibration card and also on the blue paper as shown above.
You can only display one measurement at the same time - I have copied several measurements together with Photoshop.
- Look up the "temporary copy of the card's data file" (that named "R140604_WithRGBFromD50.tmp" above) and look for the blue values added in the rightmost column by CooRecorder.
Depending on your color card, you will find something like:
J19: 166.56
L19: 135.50
L13: 192.97
These number do not differ much from the numbers measured above!
- Save the two numbers measured from the blue papers to be used for your blue color patch, e.g. "120" and "173" as shown above.
|
|
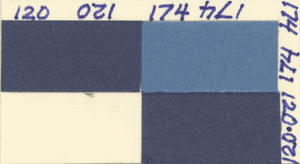 |
- Cut out suitable patches from your blue papers and mount them side by side together with the blue values as measured above. This is one of my mine.
I think it should be made smaller.
|
|
 |
|
Use your patch when scanning so that the color spots are visible together with the blue CI values.
|
|